
Build a website with Gatsby and Strapi Core concepts
I like writing about project infrastructure, especially after something has shipped.
This is not a documentation rewrite
I will not repeat what the official docs already explain well: Gatsby and Strapi.
If you need a specific feature, start there.
Resources
Before going further, these are the articles and docs I read first.
- Build a static blog with Gatsby and Strapi
- GraphQL and Gatsby
- Data in Gatsby
- gatsby-image
- Strapi Upload
- Strapi Webhooks
If you already know the core ideas, skip ahead and start connecting the pieces.
What is Strapi?
Strapi is an open-source, content-focused headless CMS. I highlight open source because it changes how you think about a CMS. If it has not changed yours yet, it is worth trying a next-generation headless CMS.
This is the picture I use for Strapi's core components, and for the headless CMS idea in general:
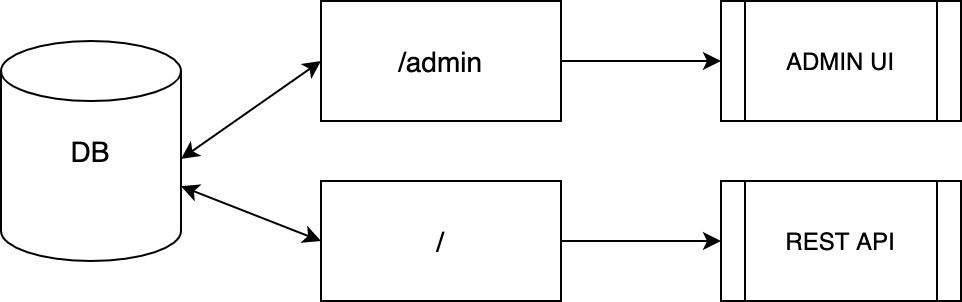
The admin UI and the API are where the work happens. The point is to split data management from presentation. Gatsby takes the presentation side.
Gatsby and Strapi work well together
This combination feels different from Gatsby on its own. A headless CMS owns the data, so you are not storing content as code. That adds operational work: you have to host Strapi, run a database, and keep both available.
Infrastructure setup
Infrastructure matters as much as the framework you pick. This guide uses AWS. I always find it hard to choose how much complexity a project needs. Not every service belongs in Docker, and not everything belongs on Kubernetes.
To move faster and keep support simple, we started without automatic deploys. The Strapi infrastructure is Amazon EC2 plus an Application Load Balancer so the service can take public traffic.
The Strapi layout ended up like this:
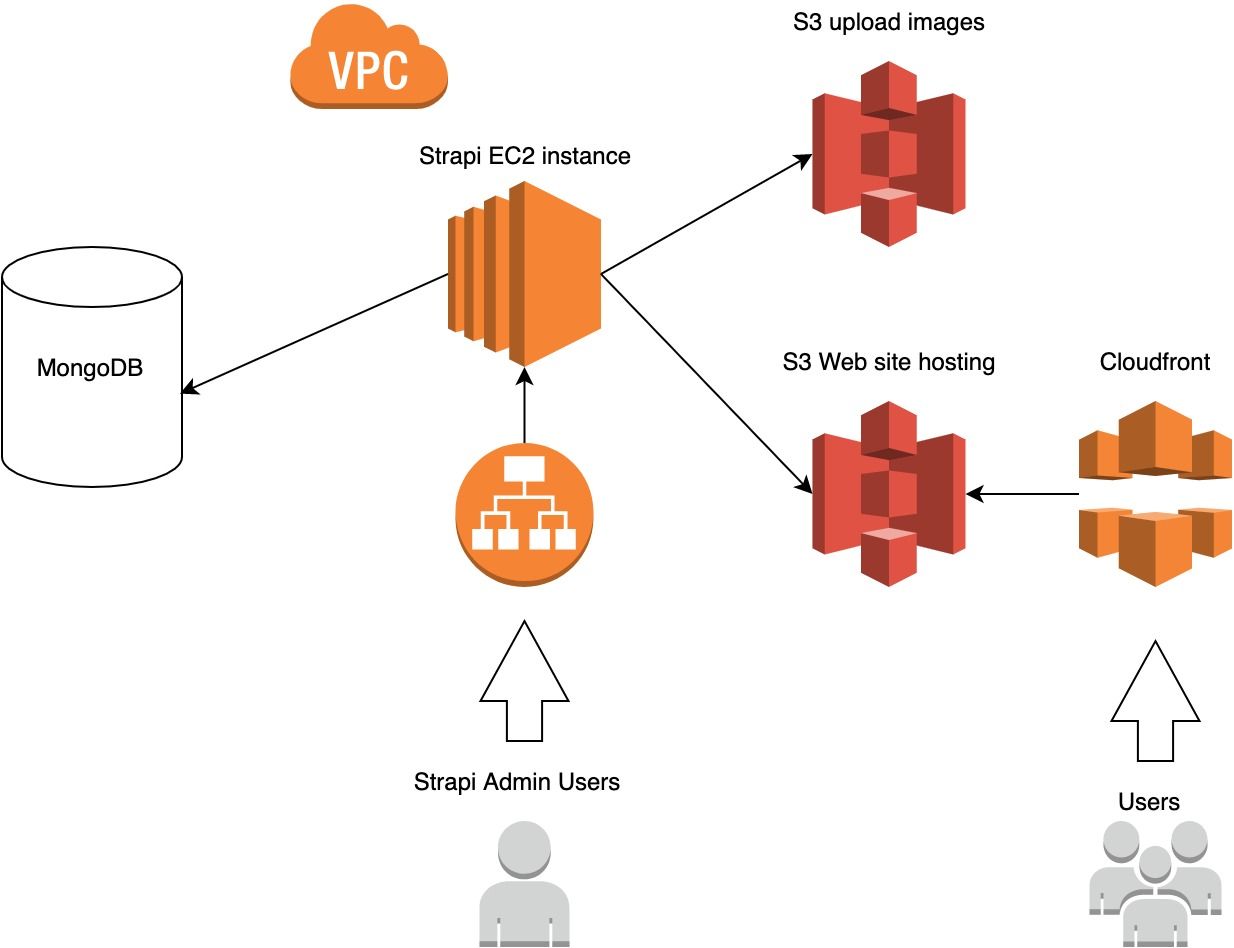
The Application Load Balancer sits in front of the whole setup. It is worth having even when you run a single EC2 instance. Besides the usual load-balancer benefits, it lets you use Route 53 and AWS Certificate Manager.
Those two finish the infrastructure: your own domain, and TLS so the connection stays encrypted.
For Gatsby we chose:
Together they store the files, cache them, distribute them, and serve the static site.
Triggering a Gatsby build
Gatsby is a fast static site generator, and the builds need somewhere to run. The frontend should rebuild in two cases:
- The code changes
- Content in the headless CMS changes
A webhook covers both: it receives the event and runs the deploy command.
We put that handler behind the same load balancer as the Strapi API and admin. We already use PM2 for Node.js, so a separate PM2 app for deploys was the simple choice. This is the picture I ended up with:
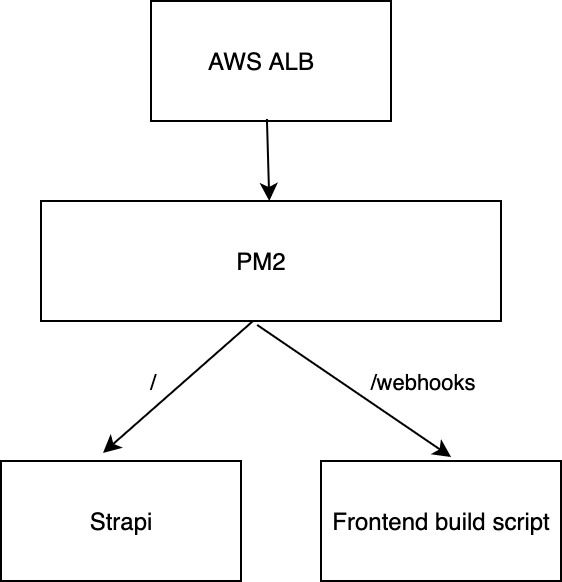
A webhook on one of your servers can be called from CI or from Strapi webhooks. After that, the missing piece is the small app that receives the hook and runs the deploy.
Webhook handler
We wrote the webhook handler in Node.js and hosted it under PM2 so we would not add another proxy or more infrastructure.
In the Strapi project, create a folder for the webhook app. However you deploy, that folder needs to land on the same servers as Strapi.
const http = require('http')
const exec = require('child_process').exec

const STRAPI_WEBHOOK_AUTH_TOKEN = process.env.STRAPI_WEBHOOK_AUTH_TOKEN

let isActiveDeployment = false

const getAuthToken = (authHeader) => {
  if (authHeader.startsWith('Bearer ')) {
    return authHeader.substring(7, authHeader.length)
  }

  return null
}

http
  .createServer(function (req, res) {
    req.on('data', function (chunk) {
      if (isActiveDeployment) {
        res.writeHead(400, { 'Content-Type': 'plain/text' })
        res.write('Deployment is in progress')
        res.end()
        return
      }

      const token = getAuthToken(req.headers.authorization)
      if (token === STRAPI_WEBHOOK_AUTH_TOKEN) {
        res.end()
        isActiveDeployment = true
        // npm, or a shell script, can run the deploy the same way
        exec(
          'cd ~/your-frontend-code && make deploy-frontend',
          (error, stdout, stderr) => {
            if (error) {
              console.error(`exec error: ${error}`)
              return
            }
            console.log(`stdout: ${stdout}`)
            console.log(`stderr: ${stderr}`)
            isActiveDeployment = false
          }
        )
      } else {
        res.writeHead(401, { 'Content-Type': 'application/json' })
        res.end()
      }
    })
  })
  .listen(8080)
Walking through the script, STRAPI_WEBHOOK_AUTH_TOKEN is the shared secret. In the Strapi admin, open the Settings tab to see the webhooks configured for the application.
You can also turn individual Strapi webhooks off. The Strapi webhooks post covers the details.
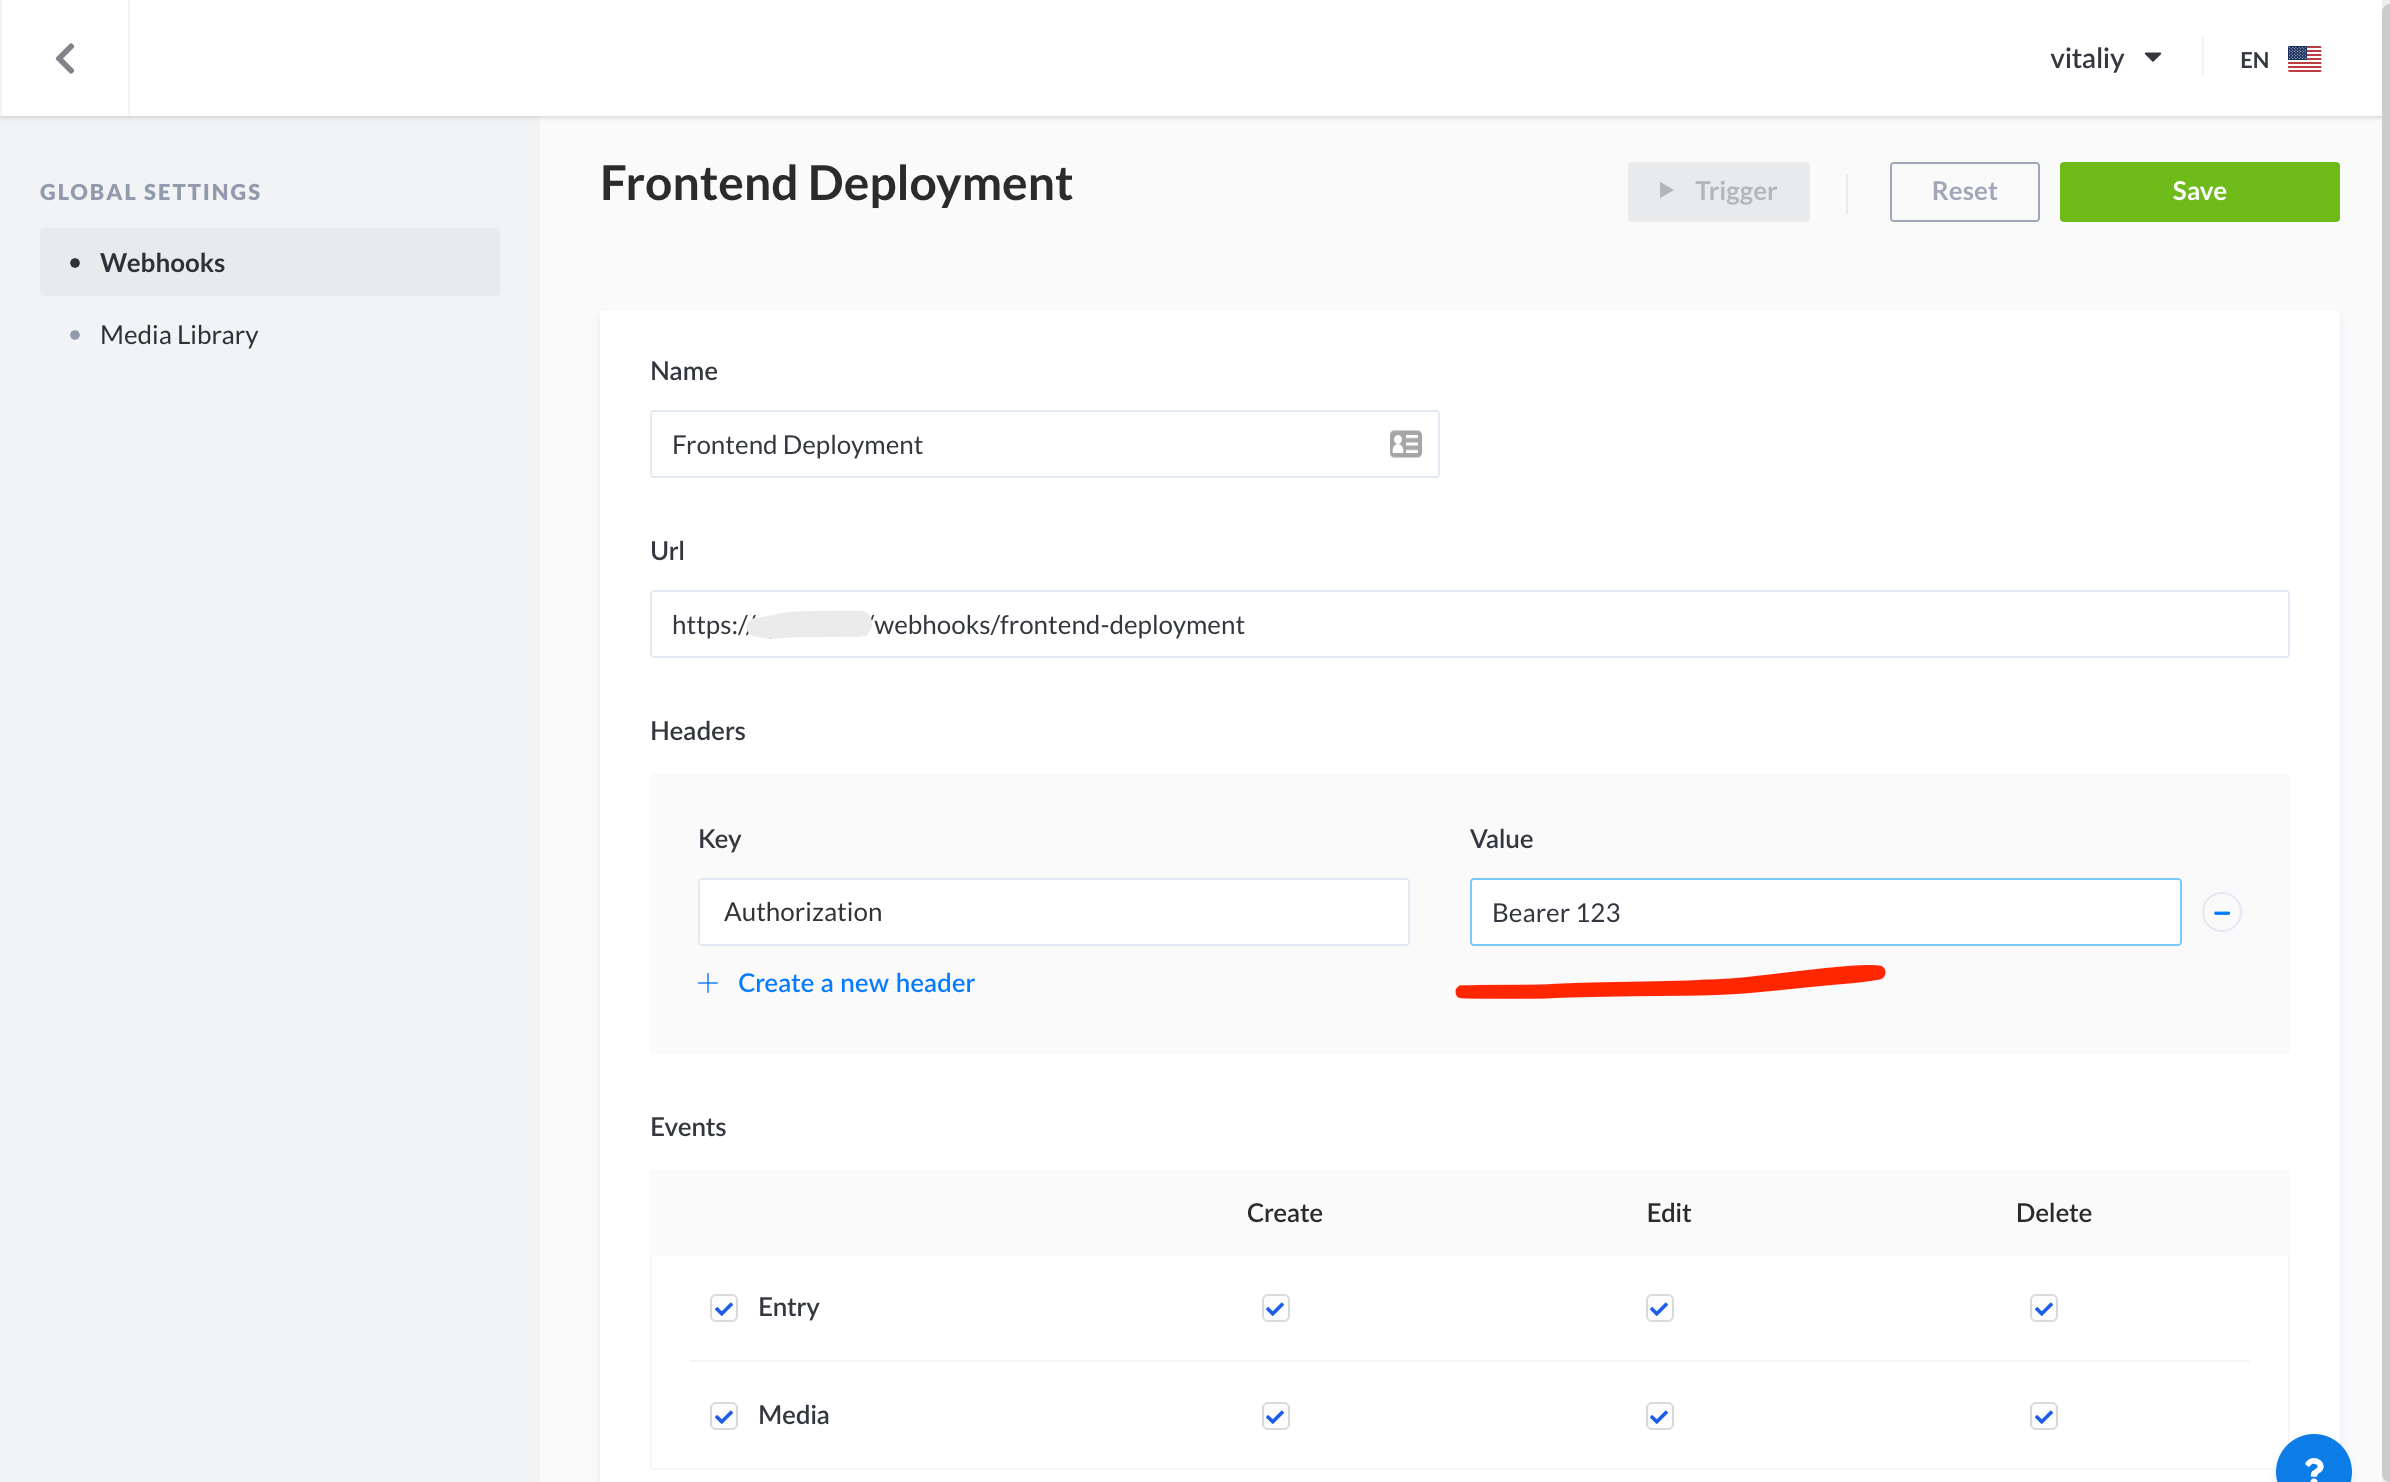
For a basic level of protection we check a bearer token. That is the same token the script above expects. The header is named like HTTP Basic authentication in some setups, but the check itself is a shared secret on the request.
Strapi customization
Customization was a requirement from the start. Payments, email notifications, and similar features need custom logic, and that logic has to live somewhere.
Strapi follows an MVC shape, so customizing controllers is one of the main extension points. This article has more context: Customizing controllers. You do not need special knowledge before you start. There is no separate "Strapi language" to learn, which is what I like about it.
Conclusion
This infrastructure is a starting point, not the end. You still have a lot of control, and many steps are manual, which is fine while the project is small. The next step is CI/CD, where builds and the Strapi webhook handler share the work. The idea stays the same: a fast, reliable frontend and a simple content API.
Happy coding!